Overview
The Category Schedule allows you to plan, list and track the specific items of a budget category, roll up monthly totals, and dynamically link the plans to drive your budget on the Category sheet. The solution is a brainstorming/planning tool. Consider which of your categories have specific events, costs or activities for which you’d like to make a budget plan.
The tool assumes there are two, mutually exclusive, types of scheduled activities in a category: discrete and baseline.
- Discrete: These are the specific, namable, budget amounts associated with a category. In a category for Clothing, for example, a discrete item might be the proposed cost of a suit or jacket you plan to buy.
- Baseline: This is an amount set aside in your budget for general spending periodically in the category. In addition to specifically budgeted items (like the suit or jacket) you may wish to set aside a monthly amount for clothing to cover unknown expenses.
The idea is to list the proposed components of a budget category, both baseline and discrete so that the planned activity becomes more visible and manageable, driving the monthly budget roll-up
Screenshare Video
Watch the screenshare demonstration video to see how this template works.
Installation
- Open your Tiller Money template
- Install or launch the Tiller Community Solutions add-on
- Open the add-on and choose "Builder Contest” from the tags dropdown on the Explore tab
- Click on “Category Schedule”
- Choose “Add to Spreadsheet”
Navigation
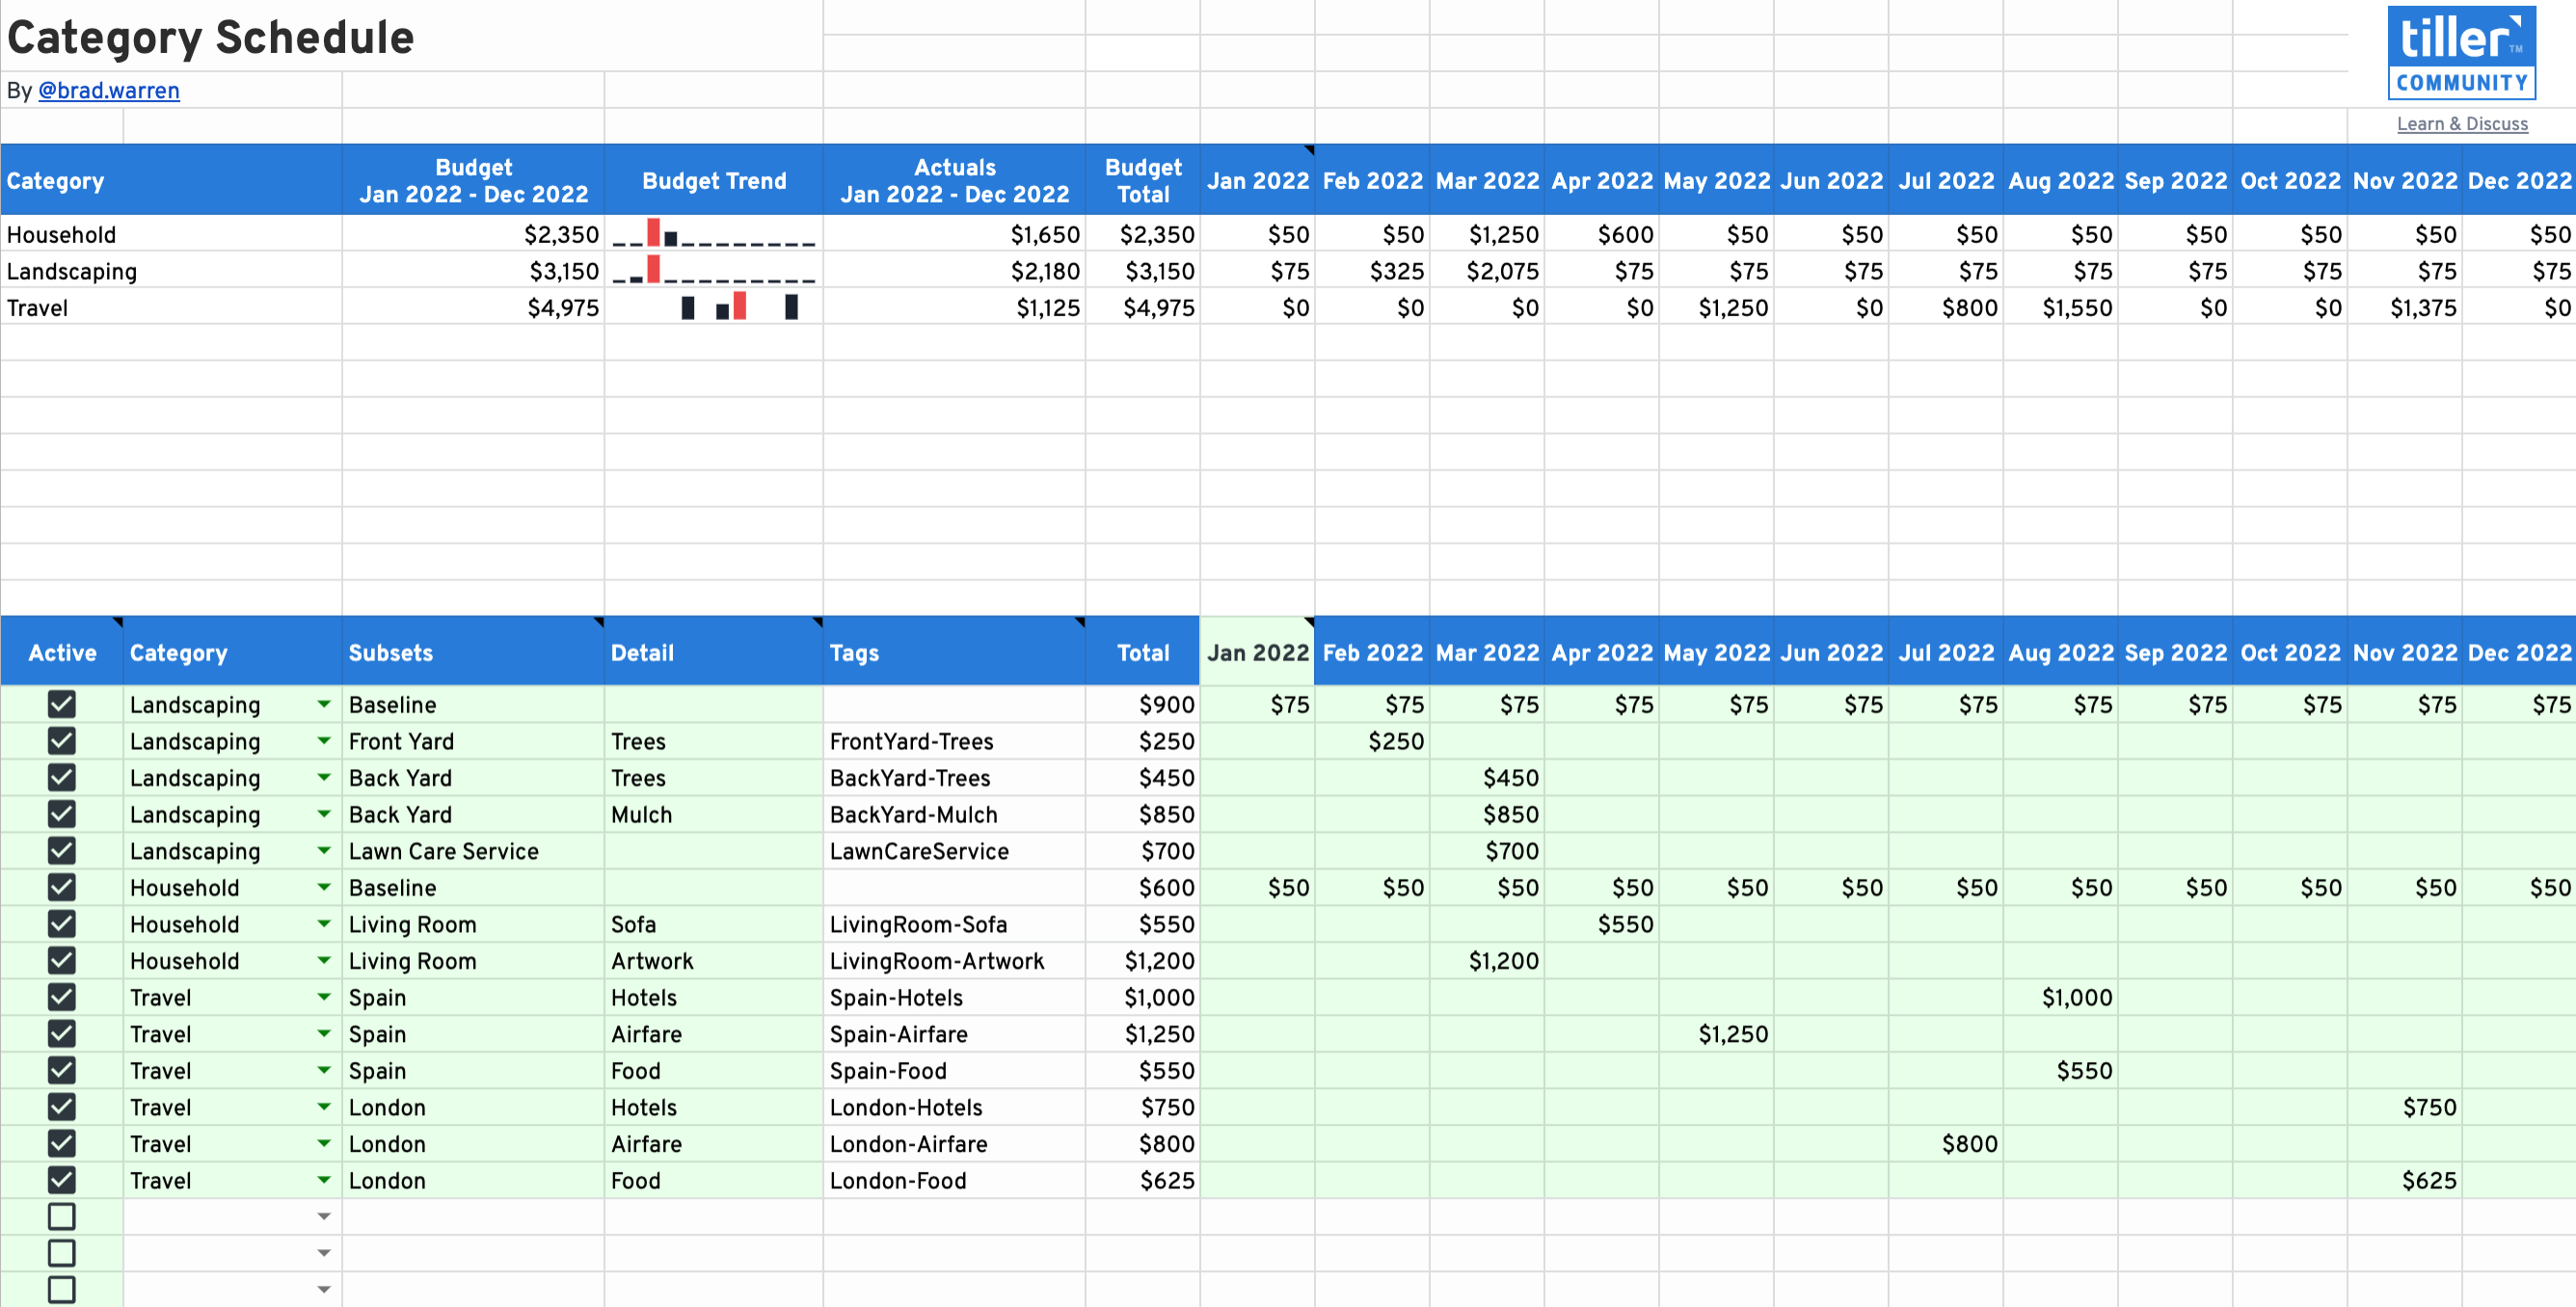
Here’s a quick overview of the Category Schedule’s components, referencing the diagram below.
Column Headings (line 20)
- Active: A checkmark in this box keeps the item active in your budget. Take the check mark out, and the item will remain in your list for reference, but the budget amounts associated with it drop out of all totals.
- Category: From your list of categories, select the one related to the item you’re scheduling.
- Subset: Create and enter a grouping reference for a set of items to schedule. (Note: this is different from the use of Groups throughout the Tiller universe.)
- Detail: Create an additional level of specificity to further identify the item to schedule.
- Tags: This item is created for you, on the fly, as a combination of the Subset and the Detail entries. The absence of spaces is intentional.
- Total: The automated sum of your monthly amounts.
- Jan-Dec: The monthly budget amounts of the schedule item.
Column Headings (line 5)
All of the data in this section are dynamically created as you enter data in the lower, planning section. Don’t enter data in the upper section.
- Category: Each category associated with a schedule item in the lower section will appear here.
- Budget (time frame): The sum of all budgeted items in that Category
- Budget Trend: Graphical representation of the budget trends.
- Actuals: From your Transaction sheet, the sum of all actual activity associated with the Category.
- Budget Total: The sum of the scheduled items for this category.
- Jan-Dec: The roll-up sum of the scheduled items for this category (from the section below.)
How It Works
There are three basic steps to using the Category Schedule to drive your budget:
- Create the Category Schedule Items
- Copy your Newly Created Tags
- Link the Category Schedule Roll up to your Category Sheet
Create the Category Schedule Items
- If your category will have both discrete and baseline amounts, add the baseline amounts first, by selecting a Category from the drop down, and then in the Subset column enter the word, “Baseline.”
- Note that, since a detail is not needed for the baseline amounts, the tool doesn’t create a customized Tag for the baseline items. Move to the right and enter the baseline budget amounts for this Category in the appropriate monthly columns. The Category’s roll-up begins to appear at the top of the tool.
- Now you’re ready to enter the discrete amounts for this category. On the next line down, select the related category, then enter the Subset name and then a Detail for more specificity. The related tag is created for you, driven by these entries. Enter the budget amount for this item in the month you’re anticipating the activity.
- Proceed in the same manner, listing as many category components as you wish.
Note: You may divide Subset activity across categories. This may require a bit of planning ahead of your data entry to identify the associated grouping, but the category roll-ups will work just the same.
Copy your Newly Created Tags
- Once you have added all of the scheduled items, to make your newly created Tags available throughout the Tiller universe, highlight and copy all of the Tags in Column E on the Schedule and paste them into the next blank line on your Tags sheet. (You may delete any blank cells in your tag list.)
- Note: If you change the data that drive the tags in the Category Schedule, you’ll need to update the associated tag in your Tags sheet.
Link the Category Schedule Roll up to your Category Sheet
This is the heart of the Category Schedule. You need to connect your summary totals at the top of the Schedule to the appropriate Category line on your Category sheet.
Here’s how to do that:
- For each of the Categories for which you have a roll-up Category summary at the top of your Schedule, copy the formula below and paste it into each of the 12 monthly budget cells of that Category’s line in the Category sheet:
=iferror(offset('Category Schedule'!$G$5,match(offset($A$1,row()1,match("Category",$A$1:$1,0)-1),'Category Schedule'!$A$5:$A$16,0)-1,match(offset($A$1,0,column()-1),'Category Schedule'!$G$5:$5,0) 1),0)
- After pasting the formula into the cells, your Category Schedule’s roll-up budget is now linked to your Category sheet, and you should see the roll-up amounts from the Category Schedule sheet appearing as the 12 monthly budget amounts for the related category in the Category sheet.
- Note: Be sure to create some kind of visual cue on this Category line (bold the Category name or create a different shading) in your Category sheet to remind you that these budget numbers are being driven by the Category Schedule.
- Remember not to overwrite the data for this line in the Category sheet or it will break the references. (To repair, simply recopy and paste the linking formula.)
Follow these same steps for the other categories summaries at the top of your Category Schedule to complete your work.
Expanding Beyond 10 Categories
You may have a need to use the Schedule for more than 10 Categories. To do so, follow these steps:
- Insert the needed number of blank rows in the upper section of the sheet by inserting them between rows already present.
- Click into cell A5 and change the LIMIT number in the formula from 10 to a number that exceeds your need. (If you’re adding five rows, change the number to 20, just to keep it easy.)
- Copy the needed formulas in columns C through R into the new rows.
- Make sure to extend the linking formula in the
Categoriessheet which references the rangeCategory Schedule'!$A$5:$A$16. This range will need to be extended to include newly-added rows. - That should do it. Add a new category to schedule at the bottom, and the new summary for the new category will appear at the top.
Getting Ready for Next Year
To prepare your Category Schedule for the coming year, here are a few short steps:
-
Add the Coming Year’s Columns to the Categories Sheet: Add twelve new, empty columns to the right of the current year’s December column, and then extend the formula in the header row to these new columns to add the dates for the coming year. (The formula in the header should be something like, =EOMONTH([cell address to the left],0)+1
-
Disconnect the Schedule: Because you’ll likely want to edit or delete the current entries in the Category Schedule to make room for the coming year’s plans, doing so without this step will change your prior year’s budget unintentionally. So, you have to break the links between the Category Schedule and the Categories sheet, but retain your prior year’s budget data. To do this, in the Categories sheet, for each category linked to the Schedule, simply select the 12 months’ data coming from the Schedule. Copy and then right-click and select Paste Special, then Values Only. This will retain your budget data provided by the Category Schedule, and disconnect it from the Schedule. Do this for each category whose budget is coming from the Schedule.
-
Update the years/header: In the Category Schedule, select the cell in column G, in the header row for the entries table, that reads for the month of January. (NOTE: This is not G5. You want the cell in column G of the header row below in the entries section.) Change this date to January 1 of the coming year. The entire Schedule should update.
-
Optional Step: for Tags Users: If you are using the tags auto generated by your Schedule entries to flag transactions in your Transactions sheet, AND have dynamically linked these to your Tags sheet using this formula, =sort(unique(flatten( FILTER(‘Category Schedule’!E28:E,‘Category Schedule’!E28:E<>“”)))), where E28 represents the first tag in your Category Schedule, on your Tags Sheet, you’ll need to find the place in the Tags sheet where this formula is added, copy downward, right-click, Paste Special/Values only. This will break the link to the Schedule, but retain your data. If you want to continue the dynamic link for the coming year’s tags, simply re-add the formula to the bottom of the pasted tags. Without this step, any tag deleted in your Schedule in the next step will flag as an error in your Transactions Sheet, since it no longer exists.
-
Review, Edit or Delete Prior Year’s Schedule Entries: with your Category Schedule links now broken, review the entries you made in the Schedule and determine which of these you want to retain for the coming year and any changes you wish to make. If there are any entries that no longer apply to the coming year, delete these entirely.
-
Enter your new Category Schedule Entries Add your entries for the coming year, connecting the Schedule to the Categories sheet as before, as explained in the note, seen when hovering over G5.
You’re all set.
Community Builders’ Workshop Video Replay

Q and A from the webinar:
Q: Do you use a baseline budget for all categories, or only those that you want to explicitly budget irregular expenditures?
A: You can include a baseline budget in the categories when you want to provide resources for a category without the detail. Then, the irregular expenditures are added on top of this to roll-up into the category’s budget total. For example, if you are developing a schedule for Clothing, you may decide to spend $1,200 per year, $100 per month, in general for clothing. So, your baseline would be $100 per month. But in addition to this, you may be aware of other, specific items you wish to purchase in addition to the baseline, such as a new suit, work uniforms, etc. These items would be given their own line and amount in the schedule and roll-up into the overall budget. Baseline budgets, however are not necessary for to use the Category Schedule well. You could as easily simply program two or three discreet, known budget items, and these would then form the roll-up for the category budget.
Q: I’m having a little trouble differentiating the purpose of subsets. What do they do that tags couldn’t?
A: Great question. The purpose of the subsets is to drive the creation of the tags and further identify the items on each of the Category Schedule’s entries. The Subsets are, in essence, the tags. Without creating the subset, the tags won’t be developed.
Q: Could the template work for selected expenses e.g.discretionary?
A: As above, yes: the template could work with only discreet items, but recall that if there are additional budgeted expenses anticipated beyond these within a category, you’ll need to add those in the Category Schedule template to include them in the category’s overall budget.
Additional Notes
- When you make any changes to the budget data in the Category Schedule (timing, amounts, active/inactive) these changes will dynamically be applied to your Category sheet and throughout the Tiller universe wherever budget numbers are reported.
- If you wish for more granularity in reporting and tracking, unhide rows 17-19 by clicking the plus sign to the right of the row number 16 to reveal a reporting tool for Subsets and Tags. Use the dropdowns to select the Subset or Tag of interest, and the tool will return actual amounts from the Transaction sheet among items associated with the subset or tag.
- Because of a limiting factor in the Google Sheets, you will see an application error when switching between Tags and Subsets in A18. This will resolve as you select the appropriate item in B18 and does not affect performance.
Happy Tillering!